Homemade Spinach Fettuccine

For my birthday, my Mother surprised me with pasta attachments for my KitchenAid® and let me tell you…our house has been making homemade pasta ever since. Pasta is one of the EASIEST things to make, with or without special pasta tools, and only requires three simple ingredients – flour, eggs, salt. From these three simple ingredients you can enhance your pasta with herbs, spinach, beets, lemon, garlic and more! With Spring already upon us, I thought it would be fun to experiment with making different types of pasta using fresh vegetables from my local farmers market.

I’m going to share with you a recipe utilizing my handy KitchenAid tools, however I’m also going to share with you a way to make homemade fettuccine with only a rolling pin and knife.

  • 2 1/2 cups “00” Tipo Flour* (I use this brand)
  • 3 eggs
  • Pinch of salt
  • 3/4 – 1 cup fresh spinach, stems removed
  • 1-2 tablespoons cold water (if needed)

Begin by steaming the spinach until just wilted (about 2 minutes). Drain and squeeze the spinach between two towels to remove excess water. Puree the spinach in a blender with the eggs.  In the bowl of your stand mixer, add flour and salt and make a well. Add in the spinach/egg mixture and combine utilizing the flat attachment on low for about 30 seconds. (alternatively – you can create a well on a clean, wooden cutting board and mix the ingredients until well combined). If mixture seams a little dry (when you pinch dough between fingers it should stick together) add in 1 tablespoon of cold water.

Switch the attachment to the dough hook and knead the dough for another 2-3 minutes on low. Remove the dough from the mixer and knead by hand on a lightly floured surface until dough comes together in a ball. Cover with plastic wrap and let rest for about 20 minutes. (if kneading by hand – use your palm of your hand to knead the dough. If sticky, gradually add some flour and combine until dough is a cohesive mass. Lightly flour the cutting board and knead for an additional 5 – 6 minutes adding flour to the board as necessary. Cover in plastic wrap and let rest for 20 minutes)

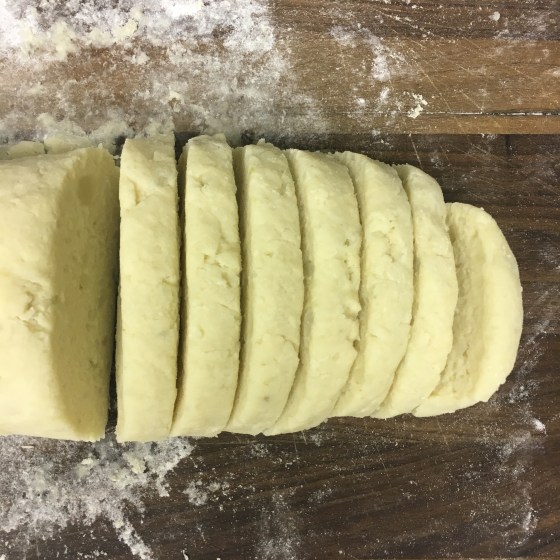
Divide the dough into 4 pieces. Roll one of the pieces out to about 1/4 inch thickness. Using the KitchenAid pasta roller pass it through the 1 setting and fold the dough over. Pass through again and repeat until the dough is smooth. Lower the setting to 2 and pass through. Continue until you are at the 4th setting. The pasta will be long – lay it on a lightly floured surface and cut into half. Lightly dust the top of the pasta sheets with more flour. Repeat with the remaining pieces of dough. (if you don’t have a pasta roller – don’t worry! Use a rolling pin to press the pasta as thin as possible. You want to build in layers, folding it back over itself, and flattening again and again. Let the sheets sit out and dry for about 15 minutes)

Switch over to the KitchenAid Fettuccine attachment. Pass the dough through the attachment and hang the fettuccine on a pasta rack or lay flat on a floured surface. (now if you don’t have a pasta cutter, simply take your sheets of dough and fold them at 3-4-inch intervals to create a flat, rectangular roll. Utilizing a sharp knife, cut the roll into strips of your preferred thickness)

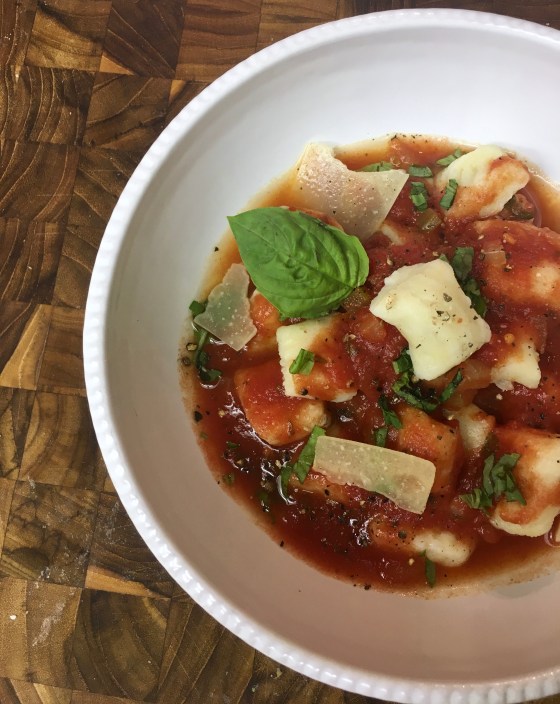
Bring a large pot of salted water to a boil.  Fresh pasta cooks WAY quicker than dried so make sure you don’t step away from the kitchen. Add the pasta and cook for about 2-4 minutes (it will float to the top when done). Drain and toss with your favorite sauce. Serves 4.


I made a dairy-free garlic cream sauce (almond milk, fresh garlic, vegan cheese, flour, salt, pepper) and tossed the pasta with fresh spinach, artichoke hearts and garlic chicken sausage.


*You can also use all-purpose flour if that’s all you have. I prefer “00” Tipo because they are the softest, finest, Italian flours resulting is velvety, smooth pastas.

Advertisement

Lumpia

Fried lumpia is a traditional Filipino dish, similar to egg rolls,  that are stuffed with pork and vegetables then fried to perfection. When I think of lumpia it makes me smile because it brings me back to happy childhood memories of helping my Mom in the kitchen. Often times, we would whip up this dish for large family gatherings or as a savory snack during the holidays.
What I love most about Filipino cuisine is its tastes very from salty to bitter; spicy and sweet. And what I love about lumpia (besides the garlic-vinegar dipping sauce) is everyone’s recipe is slightly different. My co-worker Anna usually adds in bean sprouts and green beans to the traditional list of veggies while others add in water chestnuts, mushrooms or even green onions.

Here’s a more traditional recipe for lumpia that was passed down from my Mom, which includes a little cilantro for added freshness.

Lumpia

  • Vegetable oil
  • 1 pound ground pork
  • 3 garlic cloves, minced
  • 1 small onion, chopped
  • 2 carrots, minced
  • 1 tablespoon soy sauce
  • 1 teaspoon garlic powder
  • Cilantro, chopped
  • Salt and pepper to taste
  • 15 – 30 lumpia wrappers
  • Egg wash (to seal the wrappers)

Heat 1 tablespoon of oil in a large skillet or wok and cook the pork until browned. Remove the pork and set aside. Drain grease from the pan leaving a thin coating. Add garlic and onions and saute for about 2 minutes. Add in the carrots and continue to cook until slightly tender, yet still crisp (about 5 minutes). Remove from the heat and stir in the cooked pork. Season filling with soy sauce, garlic powder, salt and pepper. Set aside until cooled. (make sure filling is cool to the touch, otherwise it will make the wrappers soggy)

Place filling towards the center edge of the wrapper. Fold over the corner, tuck in the sides and roll neatly. I prefer to roll shorter / fatter rolls where some prefer to roll long and skinny – it’s up to you. Now seal the wrapper with egg wash or water. Below is an example from the back of the wrapper package:


Heat oil in a heavy skillet over medium heat for about 5 minutes. Add 4-5 pieces of lumpia to the oil and fry until golden brown on all sides (about 2 minutes). Drain on paper towels and serve immediately with a garlic-vinegar dipping sauce.

Garlic Dipping Sauce

  • 1/2 cup white vinegar
  • 3 garlic cloves, minced
  • Salt and pepper to taste

Combine all ingredients and serve alongside the lumpia.


To me, lumpia brings people together. I recently made it to surprise my grandmother on her 85th birthday as it’s her favorite Filipino dish.

Homemade Gnocchi in a Simple Tomato Sauce

Gnocci with Homemade sauce

This year’s tomato harvest at Creekview Farm was never ending! From San Marzano’s to beautiful Herilooms, we had enough harvest for two large batches of tomato sauce, two large batches of bloody mary mix, endless caprese salads and beyond. To help me warm up on these cooler nights, I decided to pair our homemade tomato sauce with a simple gnocchi recipe topped with shaved Pecorino and fresh herbs.

Tomato Sauce

  • Tomatoes (I used San Marzano tomatoes from Creekview Farm)
  • Fresh oregano
  • Fresh basil
  • Bay leaves
  • Garlic, chopped
  • Carrots, chopped
  • Onions, chopped
  • Celery, chopped
  • Salt and pepper, to taste

Creekview Tomato Strainer

I started off by pureeing the tomatoes using our super old-fashioned tomato food strainer (I remember my Mom using this all the time as a kid). The strainer helps separate out the skins and seeds, while keeping the yummy pulp and juices. And what I love most about making tomato sauce is the fact that you really can make it your own and add in whatever herbs, vegetables and seasonings you want. For this sauce, I kept it very simple by adding in a few chopped vegetables and herbs and letting it simmer all day on low until it reached the perfect consistency.

Creekview Herbs

Add chopped vegetables and garlic to a large heavy pot over medium heat, add olive oil and cook for about 5 minutes (be careful not to burn the garlic). Add tomatoes,  chopped herbs of your choice, 1-2 bay leaves and sea salt and simmer on low heat until tomato sauce has darkened and you’ve reached your preferred consistency. I simmered mine for about 8 hours on low – make sure you are constantly tasting the sauce through out the day, adding in more herbs if you desire. Season sauce with more salt and freshly ground pepper.

Ground Pepper

Store in an airtight container for a week in the refrigerator or 3 months in the freezer. TIP: when freezing, make sure you freeze in 2-4 serving portions.

Gnocchi

  • 4 russet potatoes
  • 2 cups flour, plus extra for dusting
  • 1 egg
  • salt
  • Pecorino or Parmigiano-Reggiano
  • Fresh basil

Begin by boiling the potatoes (skins on) until soft and tender. While they are still warm, peel them and pass them through a potato ricer (if you don’t have a ricer, you can use a hand masher or fork – just be sure to not overwork the potatoes). Gather the potatoes into a mound and form a well in the center. Add the egg and salt and begin to mix together with a fork, gradually adding in the flour. Once mixed, begin to knead the dough gently until dough is slightly dry to the touch.

Aprons Gnocchi

Form dough into log and slice off 1-inch pieces. Take one of the pieces and roll into a rope about 3/4 inch in diameter. With a sharp knife cut the rope crosswise every 3/4 inch. Continue the same process with the rest of the dough.

Aprons Gnocchi

Bring a large pot of water to a boil. Once ready, drop in the dumplings for about 2 minutes (they will begin to float). Remove them with a slotted spoon and transfer them to an ice bath to stop the cooking. Remove them quickly from the bath and drain on a paper towel.

Aprons Gnocchi

When ready to serve, heat your sauce and toss gently with the gnocchi. Garnish with freshly shaved Pecorino or Parmigiano-Reggiano and basil. Enjoy with Sangiovese or Merlot.

Happy Holidays!